

How To Make Simple Animation In Photoshop
Animated GIFs are neat additions to your marketing. They're easy to consume, provide a new way to capture your viewers' attending, and can have a serious emotional bear upon. The all-time part about GIFs is that they aren't too hard to make. If you have access to Photoshop and a few minutes to spare, yous can create an blithe GIF in no time. In the post-obit tutorial on making blithe GIFs, I'm using the Creative Deject 2015 version of Photoshop, simply the steps should be similar in other versions. If you lot already know how to create a GIF, skip to the section on how to utilize GIFs in your marketing materials. Here'southward an example of an animated GIF yous might make using this tutorial: Gather the images you lot want in a separate folder. To upload them into Photoshop, click File > Scripts > Load Files Into Stack. Then, select Scan, and choose which files you'd like to use in your GIF. And then, click OK. Create each frame of the animated GIF as a different Photoshop layer. To add together a new layer, choseLayer>New>Layer. Exist sure to proper noun your layers so you can go on rails of them easily when you make your GIF. To proper noun a layer, go to the Layer panel on the bottom right of your screen, double-click on the default layer proper noun, and type in the name you want to modify it to. Printing Enter when you're finished. Once you have your layers in there and y'all've named them all, you're prepare for step two. Pro Tip: If you want to combine layers so they appear in a single frame in your GIF, turn visibility on for the layers you lot want to merge (by clicking on the "heart" to the left of each layer name then only the eyes for the layers you want to merge are open). Next, press Shift + Command + Choice + Due east (Mac) or Shift + Ctrl + Alt + E (Windows). Photoshop will create a new layer containing the merged content, which you should also rename. To open Timeline, go to the top navigation, choose Window > Timeline. The Timeline will let y'all plough dissimilar layers on and off for different periods of fourth dimension, thereby turning your static image into a GIF. The Timeline window will appear at the bottom of your screen. Here's what it looks similar: If information technology'due south not automatically selected, choose information technology from the dropdown menu -- but then be sure to actually click it, otherwise the frame animation options won't show up. Now, your Timeline should look something like this: To exercise this, first select all your layers by going to the meridian navigation menu and choosingSelect > All Layers. Then, click the carte icon on the correct of the Timeline screen. From the dropdown menu that appears, cull Create new layer for each new frame. This will brand each layer a frame of your GIF. To do this, click the fourth dimension beneath each frame and choose how long you'd like it to appear. In our instance, nosotros chose 0.five seconds per frame. The default will say Once, but you tin can loop it every bit many times as yous want, including Forever. Click Other if you'd like to specify a custom number of repetitions. Satisfied with your GIF? Save it to utilise online by going to the tiptop navigation bar and clicking File > Export >Relieve for Spider web (Legacy)... Next, cull the blazon of GIF file you'd like to save it as under the Preset dropdown. If you have a GIF with gradients, choose Dithered GIFs to forbid color banding.If your image employs a lot of solid colors, you lot may opt for no dither. The number next to the GIF file determines how large (and how precise) the GIF colors will exist compared to the original JPEGs or PNGs. According to Adobe,a higher dithering per centum translates to the appearance of more than colors and detail -- but it increases the file size. Click Save at the lesser to save the file to your estimator. Now you're ready to upload this GIF to utilise in your marketing! Upload the GIF file into any place online that you'd put an image, and it should play seamlessly. Here's what the final product might expect similar: Pinterest was the first to enable animated GIFs, followed past Twitter. And by the summer of 2015, Facebook had too jumped on the GIF bandwagon. Then, Instagram changed the game with Boomerang, which lets users moving-picture show and share their ain GIFs. On any of these social feeds, animated GIFs can be a keen style to stand out in a crowded feed. For case, cheque out how Calm used a GIF of a heart drawing in this quote from Samuel Beckett to add together animation to an otherwise text-heavy Instagram postal service: Animated GIFs brandish in email the same style a regular paradigm does. And then why non spruce up your e-mail marketing by replacing still images with blithe ones? Not but could this help capture recipients' attention with novelty alone, but it could besides have a direct touch on your bottom line. For some brands, including an animated GIF in emails correlated with equally much as a 109% increase in revenue. Using HubSpot'southward complimentary email marketing software is an like shooting fish in a barrel way to attain this type of increase on your own site. Make use of GIFs past showcasing products, making event announcements, or otherwise enticing readers. Check out the GIF below from The Hustle, which showcases diverse prizes email subscribers can win by referring the Hustle to friends: Finally, consider the power of using GIFs on webpages to draw a viewer's attending to a specific expanse, or appoint a viewer in an otherwise text-heavy postal service. Take a look at how Bloomberg uses stick figure animated GIFs in this article on the Beijing Wintertime Olympic Games: If you don't accept one, have a look at The 12 All-time Graphic Design Portfolios We've Ever Seen, & How to Start Your Own. Editor's Note: This post was originally published in September 2013 and has been updated for freshness, accuracy, and comprehensiveness. 
How to brand a GIF
How to Create an Animated GIF in Photoshop
 Alright, let's become started.
Step i: Upload your images to Photoshop.
If you already accept images created ...

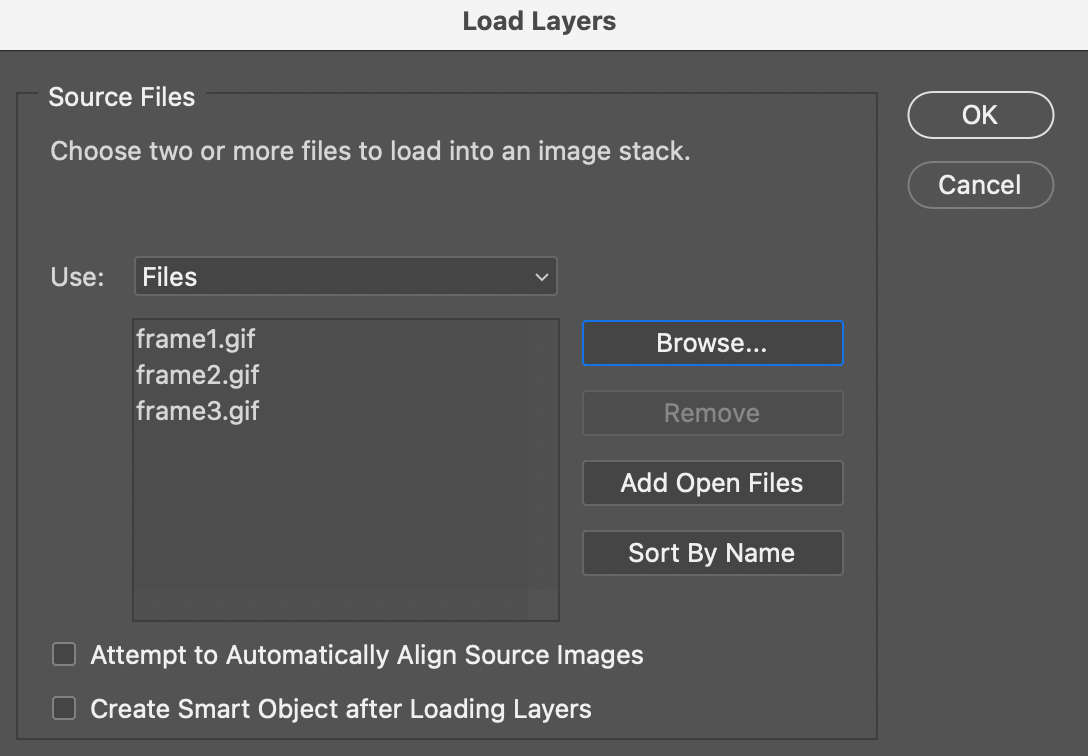 Photoshop volition then create a divide layer for each image you've selected. Once you've done that, skip to step two.
If you don't already have the series of images created ...


Step 2: Open upwards the Timeline window.


Step 3: In the Timeline window, click "Create Frame Animation."


Stride four: Create a new layer for each new frame.
![]()

Step 5: Open the same menu icon on the right, and choose "Make Frames From Layers."

Footstep six: Under each frame, select how long information technology should announced for before switching to the next frame.

Step 7: At the lesser of the toolbar, select how many times you'd similar information technology to loop.

Step 8: Preview your GIF by pressing the play icon.
![]()
Step 9: Salve and Export Your GIF


 How to Use GIFs in Your Marketing
1. On social media.
2. In your emails.
3. On websites and blog posts.
 Now that yous've learned how to make a GIF, consider using your newfound noesis to add animations to your website or portfolio.
Originally published Apr 6, 2022 seven:00:00 AM, updated Apr 06 2022
Source: https://blog.hubspot.com/marketing/how-to-create-animated-gif-quick-tip-ht
Posted by: davenportfortalwyneho.blogspot.com
0 Response to "How To Make Simple Animation In Photoshop"
Post a Comment